Notes to Upgraders
- All files in bin/, cgi-bin/, lib/ should be replaced with updated versions from the source, with appropriate editing of perl paths and shell paths. cgi-bin/admin.pl may be left as is, as this is almost certainly site-specific.
Files in htdocs/ may have been updated with new release notes.
There may be new images or icons in htdocs/images/.
There may be new mibs in mibs/.
Data directories such as var/, database/, logs/ and htdocs/reports/ may be left as is.
The contrib directory will contain new user contributions.
For files in conf/, check for updated or changed field headers in each of the -example.csv files, and edit your site csv field headers to match. Field name capitalisation ( or lack of it) is important and field names should match the 3.2 -example.csv headers exactly.
nmis-example.conf will almost certainly contain new or updated parameters, and should be checked through carefully against your site copy.
For other tabular based .csv files, I have supplied a script csv-append.pl to faciliate the appending of new fields with values to existing csv files. It references the version 3.2 nmis.conf file for table keys, so this script should be run from 3.2 /bin directory.
Example use:
Assuming directory structure was retained and 3.1 perl scripts were overwritten with 3.2 files, and now need to update 3.1 nodes.csv file with new 3.2 fields
$ su nmis
$ cd /usr/local/nmis/bin
$ ./csv-append.pl table=Nodes field=append value=N/A
$ cp ../conf/nodes.csv.new ../conf/nodes.csv
$ ./csv-append.pl table=Nodes field=runupdate value=false
$ cp ../conf/nodes.csv.new ../conf/nodes.csv
V3.1 to 3.2 configuration file upgrade notes
nmis-example.conf - has a lot of new and changed parameters and I recommend using this as a new base nmis.conf and editing as for a new install.
nodes.csv - two new fields added - depend=N/A, runupdate=false
contacts.csv - one new field added - TimeZone=0
escalation.csv - one new field added - UpNotify=false
events.csv - two new events - Node Failover and RPS Fail
models.csv - expanded model types
thresholds.csv - two new thresholds - modem and modem_util
Hardware Requirements
- a GNU/Linux or Unix machine If you have a trivial network being monitored, perhaps less than 50 devices, then perhaps any old machine will do. However, if you want to monitor a bigger network of 200 devices or more, you'll want a fast machine. I run NMIS on a Compaq DL380 w/512MB running OpenLinux 3.1, monitoring over 120 devices using the multithreading install. Note that it is important that NMIS doesn't take longer to poll all devices than the default 5mins.
- Disk Space NMIS creates lots of rrd's Round Robin Databases
for each device it manages. The current statistics options make the
file sizes as follows:
- health rrd 2.5megabytes
- reachability rrd 756kilobytes
- interface rrd 568kilobytes.
I recommend devoting a file-system to the NMIS directory. The rrd file requires space, and you may want to increase the size of the rrd files to record a months worth of 5 mins statistics for detailed trend analysis. My network of 120 devices with expanded rrds uses 3.5GB of disc space.
- Network Interface Card A host with a 100 Mb/s Fast Ethernet NIC is ideal. For optimum performance, one should assure that the requisite bandwidth is available along the full path between the monitored network and the collecting host.
- Windows 2K. NMIS has been successfully installed on W2K. NMIS
uses the Perl language and an Open Source Perl distribution is
available from ActiveState. Some people have reported problems with
RRDtool on Microsoft platforms also.
A couple of other points.
- The general consensus is that this program is well suited to Linux/Unix environment and you are broadly encouraged to do so as well.
- Since very few people, or perhaps no-one, is using Microsoft Windows then support is going to be a bit limited.
- It would be great if you can get it working on Microsoft Windows and let us know. Then we can get a more people using NMIS and develop the software even further than it is now.
Software Installation
Install all the packages listed in the required packages first, following the instructions for each of these packages, some of these packages will have their own dependencies.
Package Instructions
The packages and perl modules required by NMIS are nominal. Their presence or absence will be detected at runtime :-) but you'll save yourself some frustration by collecting and installing them first. Below, I've attempted to present them in a reasonable order in which to obtain, build, and install them.
- perl 5
If you don't have this already, you're probably way over your head, but anyway, check out the Comprehensive Perl Archive Network (CPAN):
http://www.cpan.org/
and:
http://www.perl.com/
I've tested with perl 5.6.0. and 5.8.0
- Apache
You should have this already.
http://www.apache.org/ - Korn shell
ksh is used as the shell in various place. The public domain pdksh works fine. If for some reason you don't already have ksh download pdksh from here:
http://web.cs.mun.ca/~michael/pdksh/
$ gzip -dc pdksh-5.2.14.tar.gz | tar -xof -
$ cd pdksh-5.2.14
$ ./configure
$ make
$ make check # optional
$ make install
You should add the path to the ksh binary to /etc/shells. Use 'which ksh' to see where it was installed. - RRDTOOL
This package is available at:http://ee-staff.ethz.ch/~oetiker/webtools/rrdtool/
I recommend that you install rrdtool from source, even if it is available as an optional binary package for operating system distribution. This is because NMIS expects that you've built and installed RRDTOOL something like this, and NMIS expects to find the rrdtool libraries under /usr/local/rrdtool/. This also installs RRDs, the shared-library perl module supplied with rrdtool.
$ gzip -dc rrdtool-1.0.45 | tar -xof -
$ cd rrdtool-1.0.45
$ ./configure --enable-shared --prefix=/usr/local/rrdtool
$ make install site-perl-install
The 'site-perl-install' tag is not so important for NMIS, but I use as it makes the rrdtool perl modules available to all perl scripts. (See above.)
- SNMP Session
This package contains Perl 5 modules SNMP_Session.pm, BER.pm and SNMP_util.pm, which, when used together, provide access to remote SNMP (v1/v2) agents.
SNMP Session can be downloaded from the FTP directory ftp://ftp.switch.ch/software/sources/network/snmp/perl/.
$ gzip -dc SNMP_Session-0.95 | tar -xof -
$ cd SNMP_Session-0.95
$ perl Makefile.PL
$ make
$ make test
$ make install
- Perl modules.
These are all installed the same way. I prefer the CPAN build process, as then any dependencies are picked up and installed for you.
You can install them using the CPAN shell like this:
Note to RedHat 9 installers, a UTF8 bug requires that you set a shell env variable to avoid makefile seperator errors.
$ LANG=en_US
$ export LANG
$ perl -MCPAN -e "shell"
Note for RH9 - Time::HiRes may require an env variable to be set to avoid makefile seperator errors.
$cpan> o conf set LC_ALL=C
$cpan> install Time::HiRes
$cpan> install Time::ParseDate
$cpan> install Statistics::Lite
$cpan> install Net::SNPP
$cpan> install Net::SMTP
$cpan> install Net::DNS # Only required if using DNS lookups for geoplots
$cpan> install IPC::Shareable # Only required if multithreading on Unix/Linux.
$cpan> install BSD::Resource # Only required if multithreading on Unix/Linux.
$cpan> install GD::Graph # Only required for Capacity Planning tool.
If you want to fetch and install them manually follow the list in the required packages.
- SNMP Simple. This is now part of the NMIS distribution archive and does not need to be separately installed or patched.
NMIS
After the required packages are installed you will need to unpack the NMIS distribution. The base directory <BASE> is up to you, a Solaris way is to use /opt/<PROGRAM> like /opt/nmis. The installation defaults are set for /usr/local/nmis. I opted for /nmis on a separate filesystem, mounted as /nmis. You can have the program and library files stored in one directory or file system such as /nmis/3.0/.. and the data files stored in another directory as /nmis/database/... If you create your filesystem like this, you can upgrade and trial a new version of NMIS, and keep your data in one non-versioned place.
File locations are controlled with the /conf/nmis.conf file, this is the link for the program files to read your configuration. You can modify the source to have a different config file and all other directories and control files are stored in this file. The default is /usr/local/nmis/conf/nmis.cof
If you are an ISP or multi-company service provider, you can run nmis with different configuration files, using the same program file structure. In which case, you may want to keep your program and library files in a versioned directory /nmis/3.2/.., and database and configuration files in /nmis/company_x/... For expert installers, NMIS allows all the paths to be set in the conf/nmis.conf file.
Create nmis users and groups
It is a very good idea to have someone own nmis from the unix permissions point of view, I create a NMIS user and group and put my own userid, the HTTPD (apache) user and whoever else in the group of nmis and then administration becomes a little easier and all directory permissions and created file permissions are consistent.
For RedHat:
groupadd nmis
useradd -g nmis -p 'password' nmis
usermod -G nmis apache # add apache user to group nmis, so the web interface can read/write conf files
Extract the distribution from the compressed tar file
At this point, I suggest you create the base directory,
set that base directory permissions, and then unpack
the distribution into the base directory. The base directory should be owned by the nmis user and nmis group,
and that the permissions allow write by other
members of the group (ie) apache. Also, turn on the set-group-id bit on the directory
so that newly created files (such as the distribution, and all database
files) will be owned by that group as well. Then login as the nmis user to manuiplate files etc. e.g.:
Pick a base directory for the NMIS distribution like /usr/local/nmis or /nmis and
copy all the files over from the unpacked directory.
root$ mkdir /usr/local/nmis
root$ chown nmis:nmis /usr/local/nmis
root$ chmod g+ws /usr/local/nmis
Uncompress and unpack the distribution
root$ gzip -dc nmis-3-2-0.tar.gz | tar -xof -
Copy the files to the directory base
root$ cp -R nmis-3-2-0/* /usr/local/nmis/
Change all file ownership and permissions to nmis
root$ chown -R nmis:nmis /usr/local/nmis/
root$ chmod -R 0775 /usr/local/nmis/
Now su to user nmis to fix perl paths and edit the initial nmis.conf file
Directory Structure
The directory structure is:
| Directory | Required Size | Type | Description |
| <BASE>/bin | small | Program | directory for all program files - these will change with later releases |
| <BASE>/cgi-bin | small | Program | directory for CGI program files - these will change with later releases |
| <BASE>/conf | small | Program | configuration files and some data files - these won't change |
| <BASE>/lib | small | Proram | library files - these will change |
| <BASE>/mibs | small | Program | mib files used by the program - these may or may not change |
| <BASE>/htdocs | medium | Data | files which are generated for the web pages |
| <BASE>/var | medium | Data | system files - generated |
| <BASE>/database | LARGE | Data | database files are stored here - generated |
| <BASE>/logs | medium | Data | log files |
Setting the location of Perl in the scripts
So that NMIS runs properly you will need to edit all the perl scripts and
change the top line which tells the script which shell to use currently this
line would read:
#!/usr/local/bin/perl
This should work for 99% of people as this is the usual location of
Perl. If your executable lives somewhere else then you would need to
change this ie:
#!/usr/bin/perl5
This should be done in nmis.pl, nmiscgi.pl, reports.pl, logs.pl and
admin.pl. To find where your perl lives, try
$ which perl
We have also written a script that will change these for you - check
out /bin/change_perl_bin.pl. NB - change the path at the top of this
script first !
$ cd /usr/local/nmis/bin
$ perl ./change_perl_bin.pl dir=/usr/local/nmis/bin perl=/usr/bin/perl
$ perl ./change_perl_bin.pl dir=/usr/local/nmis/cgi-bin perl=/usr/bin/perl
Setting the location of library files in the scripts
If you have used the standard directories nmis should find all its own
config files, about the only thing to do is to make sure NMIS can find
rrdtool. If you installed rrdtool with the -prefix=/path/to/rrdtool
option, then all should be OK.
NMIS uses this for the rrdtool libraries:
use lib "/usr/local/rrdtool/lib/perl";
You might have installed rrdtool to the following directory like /usr/local/rrdtool-1.0.39.
If so, then the easiest thing to do is create a symbolic link like this:
ln -s /usr/local/rrdtool-1.0.39 /usr/local/rrdtool
Fixing File Locations
NMIS was written on Solaris so there are some hard-coded file locations you might have to change in
/cgi-bin/admin.pl Change the file locations for ping, traceroute etc. to suit your machine (the command 'which ping' will tell you where it lives). You may need to change the syntax of ping - for
example the following works in Linux at about line 89 of /cgi-bin/admin.pl
if ($admin eq "ping") {
$adminoutput=`ping -c 3 $node`;
}
elsif ($admin eq "trace") {
$adminoutput=`traceroute -n -m 15 $node`;
The same applies for other commands.
Also change the first line of run-reports.sh and all the other .sh files as you
need them to #!/bin/sh if you don't have ksh at /bin/ksh ('which ksh' will tell you
where it is or report an error if you don't have it at all.)
Note that run-reports.sh may also need the path of the log and reportdir set correctly.
Configuring NMIS with the nmis.conf file.
Copy nmis-example.conf to nmis.conf and edit it first !
If you are opting for a default install directories then you shouldn't
have to change much. The default directory is /usr/local/nmis and
the only thing you might choose to do is to put the database files
somewhere else ie /bigfilesystem/nmis/database for example.
Some entries you will have to change are :
- domain=sins.com.au.
- nmis_host=www.sins.com.au
- dash_title=NMIS Dashboard
- show_non_collected_interfaces=true
- show_large_menu=true
Setting up Ping
Ping is now Perl Net::Ping it requires NMIS to run as root to use the
Net::Ping module. In effect, while the user nmis owns all the directories and file,
you must run nmis.pl as root, or from a crontab as root, to allow Net::Ping to work.
Running NMIS
You can turn on debugging with debug=<true|false|0-9> for more
information while running NMIS.
When run without debug, NMIS is silent, it will only report BAD things
and log non fatals to the NMIS log -> nmis.log in the logs directory is
the default.
First, copy each of the xxx-example files to their respective
filenames. You can edit most of these from the NMIS menu bar once you have
the web interface up and running.
Next, you should command line edit conf/nodes.csv.
Set at least one group and node here, for test and debug purposes.
Next, check that the config is all right! and this will set any directory paths that may be missing !! and also tell you about any missing files and libraries.!!!
<nmis base dir>/bin/nmis.pl type=config debug=true
Setting up web access
To have NMIS produce a sample Apache config run this or see the Apache setup document here Apache Configuration
<nmis base dir>/bin/nmis.pl type=apache
Apache should already be working, easiest thing to do is add aliases for the
relevant directories, as should have produced by the above command, ie:
Alias /nmis/ "<BASE>/htdocs/"
ScriptAlias /cgi-nmis/ "<BASE>/cgi-bin/"
Add these entries to the apache configuration generally /usr/local/apache/conf/httpd.conf and restart apache either with the
command or a kill -HUP on the daemon PID.
For Redhat:
$ vi /etc/httpd/conf/httpd.conf
$ service httpd restart
Keep in mind file permissions for the HTTPD daemon and NMIS, you should have by now created a group called
nmis and put yourself and the HTTPD user into it.
Now all the CGI scripts and base docs and style sheets will be linked in. You should be able to see something at http://<HOST>/cgi-nmis/nmiscgi.pl
Adding devices to the device list
The nodes.csv file lists all the devices you want to manage, this is a CSV file where each line defines node,community,net,type,role,group,collect,active,snmpport,depend,runupdate.
Where:
- node = The Node
- community = SNMP Community String
- net = Network Type lan or wan
- node type = switch or router or server
- role = core, distribution or access
- group = Nominal Location Group or the like
- collect = true,false do or don't do snmp stats collection
- active = true, false do or dont do reachability tests like ping
- snmpport = SNMP port - usually 161.
- runupdate = false - if set via the web UI when adding a node, will run a nmis.pl type=update to initialise the nodes dir and interface.dat file.
- depend = N/A - set to a nodename that this node may depend on - see docs.
Then, logged in as root, run an update!
<nmis base dir>/bin/nmis.pl type=update debug=true
Then run collect! Minimum! Runs collection for all nodes in the node list.
<nmis base dir>/bin/nmis.pl type=collect debug=true
Will run NMIS for router only doing a health collection and a interface collection with
debugging on. Very handy for figuring out problems.
<nmis base dir>/bin/nmis.pl type=collect node=router.domain.com debug=true
You can look at error messages in the file <nmis base dir>/logs/nmis.log
Log file locations
Edit <nmis base dir>/conf/logs.csv to change the locations of the log files to suit your system. I prefer to keep all the logs in the <nmis base dir>/logs directory so they're all part of the same filesystem and can be backed up as a whole.
Populating the Locations and Contacts Tables
In the directory <nmis base dir>/conf/ if you haven't already, copy the locations-sample.csv and contacts-sample.csv to locations.csv and contacts.csv respectively. Then edit these files and create entries for each Contact and Location in your network, the files are TAB delimited so you can use comma's in the data fields. This will be linked to the device SNMP sysLocation and sysContact, so NMIS will allow you to lookup this information dynamically.
Using the Web interface change the default location and contact parameters especially the default contact emails address to whatever you want the notifications to go.
Adding links to the links list
NMIS 3.0 will create a links.csv file for you which you can then edit from the main menubar.
./nmis.pl type=links
Event Management and SNMP Tools
The NET-SNMP nee UCD-SNMP has a bunch of great SNMP tools, obtaining and setting up this package complements NMIS quite well. More info on NET-SNMP and setting it up is here.
NET-SNMP IS NOT REQUIRED TO RUN NMIS
Setting up SYSLOG for Cisco SYSLOG
Add the following entries with suitable path changes to /etc/syslog.conf. For an example I have also added
a seperate log life for the Cisco PIX for the PIX default facility.
# save all Cisco router messages in the /usr/local/nmis/logs/cisco.log
local7.debug /usr/local/nmis/logs/cisco.log
#save Cisco PIX messages here
local4.debug /usr/local/nmis/logs/ciscopix.log
#Note: to save duplicating these logs into /var/messages, set these facilities to none.
# Log everything (except mail and news) of level info or higher.
# Hmm--also don't log private authentication messages here!
# dont repeat the Cisco stuff!
*.info;news,mail,authpriv,cron,auth.none;local7.none;local4.none -/var/log/messages
Linux RedHat syslog doesn't accept syslog messages from network routers or hosts unless you make it. ( -r option).
To do this edit /etc/sysconfig/syslog and make the line:
SYSLOG_OPTIONS="-r -m 0"
Then
# /etc/rc.d/init.d/syslog restart
Then
# chmod 644 /usr/local/nmis/logs/cisco.log
Then edit /usr/local/nmis/conf/logs.csv and make sure the lines
Cisco_Syslog /usr/local/nmis/logs/cisco.log Cisco Syslog
PIX_Syslog /usr/local/nmis/logs/ciscopix.log PIX Syslog
are in place. (Assuming that you are using a separate file for the PIX syslog.)
See /etc/syslog.conf, /etc/sysconfig/syslog and man syslog.conf and man syslogd
root$ vi /etc/rc.d/rc.local
# re-start the syslog daemon with remote networking on
kill -s SIGTERM `cat /var/run/syslogd.pid`
syslogd -r -m 0
Then check with 'ps -ef' after a reboot that you have a syslog process with the options as above,
and 'netstat -a' should show your host listening on port 514
Automate the whole lot with CRON - best to leave off the multithreading until you have completed all configurations and tested.
# mail any errors to root
MAILTO=root@mydomain.com
######################################################
# Run the Reports Weekly Monthly Daily
######################################################
54 23 * * * /usr/local/nmis/bin/run-reports.sh day health
55 23 * * 0 /usr/local/nmis/bin/run-reports.sh week health
5 0 1 * * /usr/local/nmis/bin/run-reports.sh month health
5 0 1 * * /usr/local/nmis/bin/run-reports.sh month avail
0 18 * * * /usr/local/nmis/bin/run-reports.sh day response
57 23 * * 0 /usr/local/nmis/bin/run-reports.sh week outage
######################################################
# Run Statistics Collection
*/5 * * * * /usr/local/nmis/bin/nmis.pl type=collect
######################################################
# Run the update once a day and then update the links file
30 20 * * * /usr/local/nmis/bin/nmis.pl type=update
30 21 * * * /usr/local/nmis/bin/nmis.pl type=links
#####################################################
# Run the interfaces 4 times an hour with Thresholding on!!!
*/15 * * * * /usr/local/nmis/bin/nmis.pl type=threshold
######################################################
# Check to rotate the logs 7am every day
0 7 * * * /usr/sbin/logrotate /usr/local/nmis/conf/logrotate.conf
##################################################
# save some stuff for backup every day
0 8 * * * crontab -l > /usr/local/nmis/conf/crontab.root
0 8 * * * diff /etc/httpd/httpd.conf /etc/httpd/httpd.conf.default > /usr/local/nmis/conf/httpd.conf.backup
0 8 * * * cat /etc/syslog.conf > /usr/local/nmis/conf/syslog.conf.backup
#
Some final thoughts
Let it run for about 10 minutes and then go to your website. You should see stuff - a bunch of devices you have on your network that are all up. If not, go through these notes again, read everything on the NMIS website, and join then read the YAHOO group nmis_users.
I used the web interface to add escalation, nodes, contacts, etc.
NOTE ON NODES: The only supported entries are:
devicetype = switch, router, server, generic
role = access, core, distribution
net = lan or wan
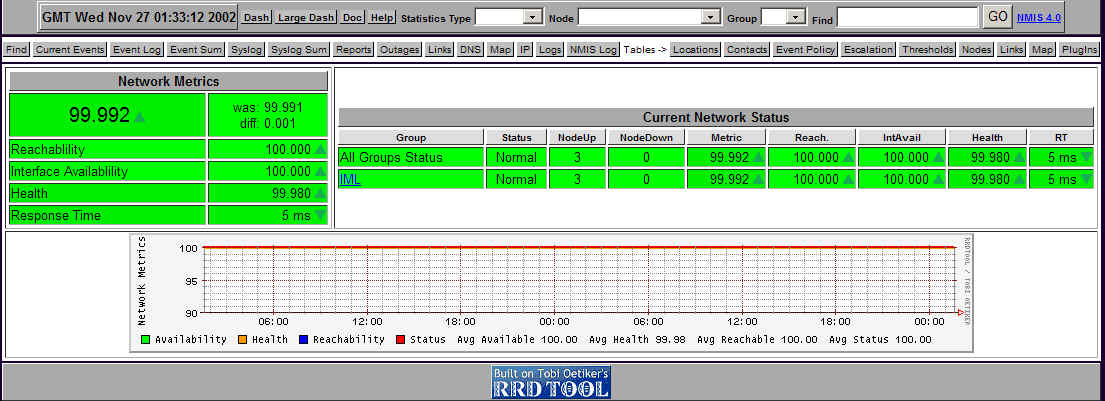
What NMIS should now look like !
Capacity Planning
The CPAN install of GD::Graph requires that your system has libpng installed and libgd installed.
These can be checked with
ldconfig -p | grep libgd
ldconfig -p | grep libpng
Note the libary path and use that when cpan install of GD::Graph asks for the library path of libgd.
If you dont have libgd, this may be downloaded and installed from www.boutell.com/gd/
To install, follow the readme in the distribution
1. Type './configure'
2. Type 'make install'
The following 3rd-party libraries will be used by gd if found by configure.
While gd will compile and install even without these, we suggest that at
least zlib and libpng are installed:
1. zlib, available from http://www.gzip.org/zlib/
2. libpng, available from http://www.libpng.org/pub/png/
A suitable crontab line may look like this ( debug=true is optional and supported)
# capacity planning every week
0 12 * * 0 nice /usr/local/nmis/bin/cplan.pl
Multithreading
Multithreading will allow parallel polling across as many threads as your hardware will support. This should enable you to poll 300-400 nodes in under five minutes, depending on your hardware. This will only work with Unix-like architecture.
You will need to have installed the IPC::Shareable and BSD::Resource modules to enable shared memory for communication between threads and control of process priorities. RedHat 9 users should set posix=true in nmis.conf for POSIX style child signal handling. The child thread name reflects the nodename being collected, so a 'ps -ef' will show which nodes are currently being collected. This helps for identifying long running processes.
The 'collect' process should have the highest priority and then use the 'nice' prefix in crontab for the 'threshold' and 'update' processes. 'Nice' with no options will make processes more polite by a factor of 10.
The parent process priority is set to 2 less than the default user process level (0) and the child threads are set to one less than this so the Web server will always have the best performance. If you use 'nice' as well with no options the priority levels of these processes are reduced by an additional 10.
Using the nmis.pl option 'mthreaddebug=true' will report in detail about parent and child process activity and individual process priority.
An example cron with multithreading:
# mail any output to rootMAILTO=root@mydomain.com
######################################################
# Run the Reports Weekly Monthly Daily
######################################################
54 23 * * * /usr/local/nmis/bin/run-reports.sh day health
55 23 * * 0 /usr/local/nmis/bin/run-reports.sh week health
5 0 1 * * /usr/local/nmis/bin/run-reports.sh month health
5 0 1 * * /usr/local/nmis/bin/run-reports.sh month avail
0 18 * * * /usr/local/nmis/bin/run-reports.sh day response
57 23 * * 0 /usr/local/nmis/bin/run-reports.sh week outage
######################################################
# Run Statistics Collection - Highest priority
*/5 * * * * /usr/local/nmis/bin/nmis.pl type=collect mthread=true maxthreads=4
######################################################
# Run the update once a day and then update the links file with 'nice'
30 20 * * * nice -n 2 /usr/local/nmis/bin/nmis.pl type=update mthread=true maxthreads=2
30 21 * * * /usr/local/nmis/bin/nmis.pl type=links
#####################################################
# Run the thresholding 4 time an hour with 'nice'
*/15 * * * * nice -n 1 /usr/local/nmis/bin/nmis.pl type=threshold mthread=true maxthreads=10
######################################################